Inside: Magical science experiments inspired by our favorite Disney movies seamlessly merge fun with education, teaching the scientific principles underlying the magic and making learning a joyful and engaging experience.
Are you kids captivated by the magical world of Disney with its talking animals, flying carpets, and singing mermaids?
What if I told you that these beloved tales also hold the key to some mind-blowing science experiments? That’s right, the same stories that enchant our children can also inspire exploration into the wonders of science.
Dive into the world of Frozen with frozen bubbles or create your own rainbow with the magic of Belle from Beauty and the Beast. The possibilities are endless.

The real magic of Disney movies is that they not only entertain but also encourage us to dream big, think outside the box, and imagine the impossible. When we use a Disney theme for science experiments, it seamlessly merges fun with education, teaching the scientific principles underlying the magic and making learning a joyful and engaging experience.
Scroll down to explore the wonders of science with us!
12 Science Experiments Inspired by the Magic of Disney Movies

1. Unleash the Frozen Powers
Enter the icy realm of “Frozen” by discovering the science behind frozen bubbles!
What you need
- Bubble Solution
- Wand
- Cold Day (or access to a Freezer)
What to do
Blow the bubbles gently on the cold surface. We prefer doing it outside on a cold winter day. However, if your winter is mild, you can do this inside. Blow the bubbles on a chilled surface (e.g., keep a plate inside the freezer for about 15 minutes before use), then slowly set the plate inside the freezer and gently close the freezer door. Check in 15 minutes.
One more way to make frozen bubbles inside is to blow a bubble in the air, catch it on your wand, and place the wand on top of a cup (or other hollow container). Slowly place the cup in the freezer. In 15 mind, take a bubble out and examine it.
The science behind the experiment
When a water layer sandwiched between two layers of bubble solution freezes, it creates stunning crystalline patterns. The bubble’s surface and interior layer remain unfrozen due to their lower freezing temperatures. Also, the frozen air outside affects the bubble’s surface tension, generating Marangoni currents. These currents create a mesmerizing mix of swirling liquid and ice crystals akin to a dynamic snow globe. It looks magical!

2. Discover the Magic of Chemical Reactions
Just like the enchanted potions in “Beauty and the Beast,” you can create some magical chemical reactions in your own kitchen. Try mixing baking soda, vinegar, and food coloring to create a bubbling, colorful explosion.
What you need
- baking soda
- vinegar
- food coloring
- fun jars (like makeup containers)
- a dropper
What to do
- Add some baking soda to a container. If you are using food coloring, add a few drops as well.
- Drop vinegar with a dropper and watch how the reaction sizzles and bubbles over the edge. So fun!
The science behind the experiment
When vinegar (acid) is added to baking soda (a base), a spectacular chemical reaction occurs that is easily observable to the naked eye. The reaction releases a gas called carbon dioxide, but don’t worry—this activity doesn’t produce enough fumes to make it dangerous. Also, check out 7 Classic Baking Soda and Vinegar Experiments To Try With Your Kids.
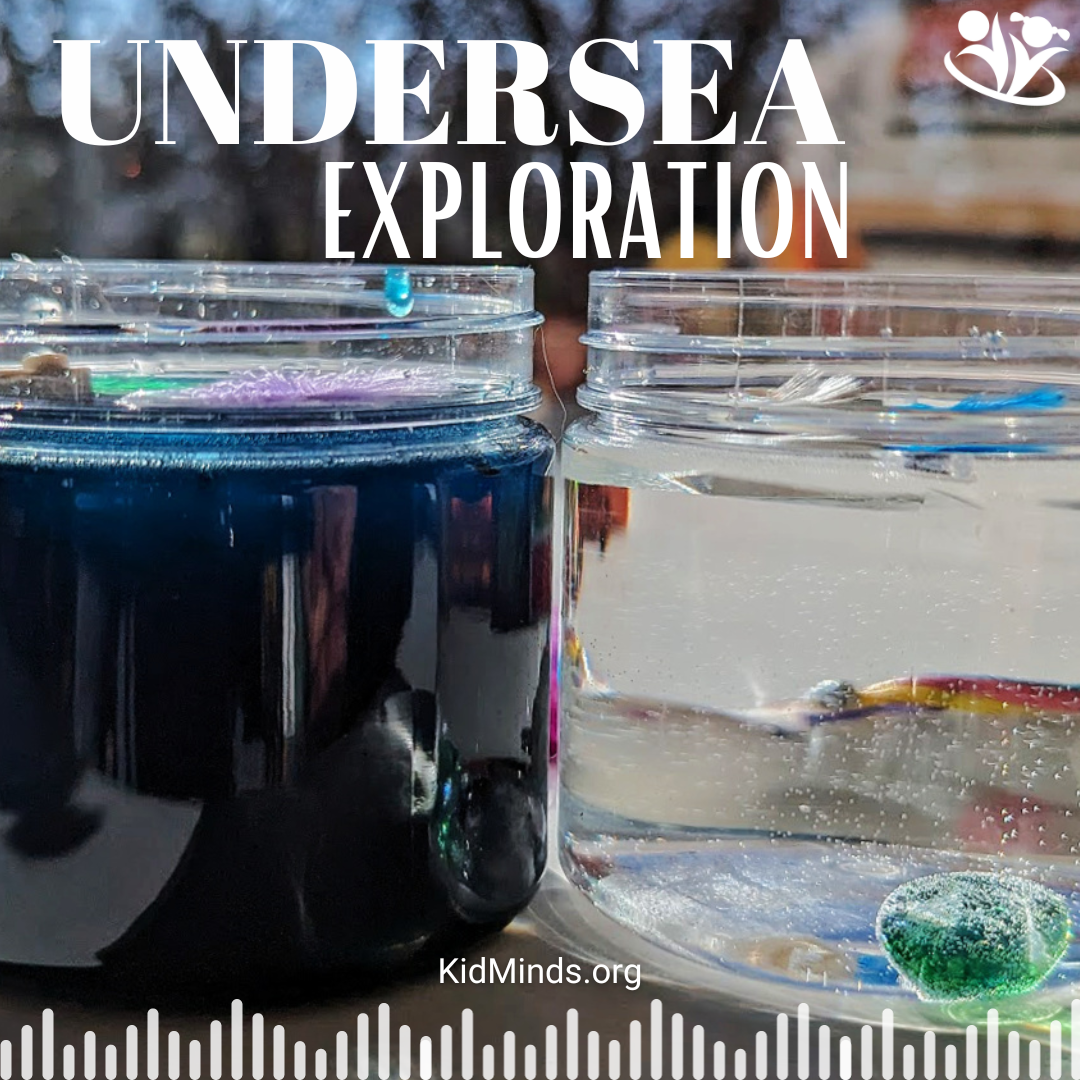
3. Simulate Undersea Exploration
Dive into the world of “Finding Nemo” by conducting your own oceanographic experiment. Fill a clear container with water, add salt and food coloring to simulate ocean conditions, then drop different objects to see how they sink or float. You can add a second container with plain water to compare observations.
What you need
- 1 or 2 containers
- Comfortably hot (or very warm) water
- Salt
- Blue food coloring
- Test objects: feathers, pennies, pebbles, marbles, small toys, glitter, LEGO blocks, etc.
What to do
- Fill one container with hot (or warm) water, stir in lots of salt, and add blue food coloring to simulate the ocean.
- Fill the second container with water (freshwater sample).
- Add the same items to both containers and test what happens.
The science behind the activity
This activity helps kids understand the concept of density. Adding salt to water makes the water denser and allows more objects to float on the surface that would sink in fresh water.

4. Engineer a Stick Raft
Moana bravely sails across the sea, determined to find Maui, who can help save her island. But cowardly Maui ditches her on a desert island and sails off in her boat! Let’s transform some humble sticks and grass into a raft for Moana. The ocean is calling!
What you need
- Sticks
- Grass
- One big leaf (for sail)
What to do
Tie a bunch of sticks together with grass. Add a mast. Test the weight distribution. For step-by-step instructions and science printables that go along with this activity, visit How to Make a Raft From Sticks.
The science behind the activity
When an object is set to float, the principles of buoyancy and gravity come into play. The object will remain afloat if its weight is less than the volume of water it displaces, thus striking a balance between the forces of buoyancy and gravity.

5. Blast Off with Rocket Science
Inspired by “Toy Story,” create a fantastic rocket launch experiment. Use an empty plastic bottle, baking soda, and vinegar to generate a chemical reaction that propels your rocket into the sky.
What you need
- A water bottle
- Vinegar
- Baking soda
- 3 Drinking straws
- Tape
- Toilet paper
- Cork that fits the bottle
What to do
- Tape 3 straws around an empty bottle to create a tripod (see the pic).
- Fold baking soda inside a tissue paper to create a packet.
- Make sure the cork fits tightly inside the bottle. You might need to wrap a bit of tape around it for a better fit.
- Now it’s the action bit! Make sure you go over this part in your mind a couple of times so you can do them quickly. Pour vinegar into the bottle, push in the baking soda packet, put a cork on, place the bottle upside down (on your tripod), and step away.
Ka-boom!
Even though we already know what happens, we can’t help screaming out in surprise!
The science behind the activity
When baking soda and vinegar combine, they trigger a chemical reaction that generates a significant amount of carbon dioxide gas. As pressure accumulates in the bottle, the cork bursts off, propelling the rocket.

6. Create a Tangled Web
Channel your inner “Rapunzel” and explore the science of spiders with a homemade spider web experiment. Stretch rubber bands of different thicknesses across a frame and observe how different tensions affect the web’s strength and elasticity.
What you need
- Tissue box or storage container
- Rubber bands (various lengths and thicknesses)
What to do
- Wrap rubber bands around your container. It’s best to pick a variety of lengths and thicknesses. Whether you do this length-wise or width-wise depends on the size of your container and the bands.
- Make sure the bands are far enough from the edge not to slide off while you play.
- Start plucking the rubber bands with your index finger. How does the sound change from one rubber band to the next?
The science behind the experiment
When we pull on the rubber bands, we make them vibrate. This causes the nearby air molecules to vibrate, creating a sound wave that travels to your ears. Our brains interpret these vibrations, enabling us to perceive sound. Typically, thinner rubber bands produce a higher pitch. Conversely, thicker rubber bands tend to generate a lower pitch. Interestingly enough, all sounds are caused by vibration.

7. Make Magic with Magnetism
Transport yourself to the world of “Peter Pan” with a magnetic maze experiment. Remember the Maze of Regrets, where all the mothers of Lost Boys go to find their boys? We will create a happy maze using a posterboard and magnetic objects, then use a magnet underneath the sheet to guide a paper clip through the maze.
What you need
- Posterboard
- Magnetic wand
- Paper clip
- Straws
- Tape
What to do
- Design a maze with cut-up straws and tape the pieces down on a poster board.
- Tape a paper clip to the bottom of a small object, like a LEGO figurine.
- Use a magnet wand underneath the board to guide your object through the maze.
The science behind the experiment
A LEGO figurine is not magnetic, so we need to attach a paperclip to the bottom of the figurine to make it move. Now, you can easily move the figurine (via a paperclip) through the maze. That’s the magic of magnetic charm in action!

8. Dive into the World of Electromagnetic Radiation
Dive into the world of electromagnetic radiation inspired by “Cinderella.” The poor girl spent hours cleaning and cooking. What if instead of taking hours to bake the traditional way, she could use the magic of a modern microwave?! Let’s make a slice of chocolate cake from scratch in one minute!
What you need
- 2 Tablespoons of hot cocoa
- Egg
What to do
In a coffee mug, mix an egg with two tablespoons of cocoa mix powder. Microwave the mug on high for one minute. If you wish, add a drop of whipped cream before digging in!
The Science Behind the Experiment
Ingredients placed in a microwave oven cook quicker than in a normal oven thanks to water molecules absorbing the micro-waves and becoming very hot fast. An egg is 90% water in the white section and 50% in the yolk.

9. Make Things Grow
Mirabel is one of my favorite Disney characters. Her superpowers are intelligence and problem-solving abilities. Is there anything that can be better than that? Okay, I’m slightly jealous of her sister Isabella’s gardening talent.
What you need
- Lemon
- Mason jar
- Paper towels
- Water
What to do
Take seeds out of a lemon and soak them for 12 hours to soften the outside layer. Line a mason jar with wet paper towels and place the seeds between the wall of the jar and the towels (so you can watch them germinate). Keep them moist. In about two weeks, your sprouted seeds can be planted in a pot and nurtured into a full-grown lemon tree.
The science behind the activity
The journey from seed to plant is a miraculous process of nature that requires water, air, soil, and sunlight. The journey starts with a lemon seed—a little package of potential waiting to burst into life. Moisture and a dark, warm place create just the right environment for lemon seeds to sprout. The sprouted seeds can then be planted and nurtured into a tree. What a wonderful way to learn about the life cycle of plants!

10. Capture the Colors of the Wind
“Can you paint all the colors of the wind?” Inspired by Pocahontas, create a vibrant chromatography experiment. Dissolve bright candy in warm water and observe how the colors move, spread out (or diffuse).
What you need
- Plate
- Skittles
- Warm water
What to do
Create a pattern with your candy around the edge of the plate. Slowly pour water into the middle of the plate. For step-by-step instructions, visit our Simple Skittles Science.
The science behind the experiment
The movement of color across the plate is caused by diffusion. In the process of diffusion, a liquid with lots of sugar (around the candy) moves towards the liquid with a lower concentration of sugar (middle of the plate). The movement stops once equilibrium is reached and sugar is distributed evenly throughout the plate.

11. Disney Princesses’ Apple Science
What’s up with Disney princesses and apples? Snow White ate it. Jasmine stole it. And did you notice that half-eaten apple on top of the barrel in Rapunzel’s tower? Let’s embrace the spirit of food science by conducting a simple apple experiment. Explore the process of oxidation and see how different methods affect the freshness of apple slices.
What you need
- Apples
- A lemon
- Airtight container
- Rubber band
- Plate
- Knife
- Lemon squeezer
What to do
Coat some apple slices with lemon juice. Put the other apple slices in an airtight container. Finally, tie the rest of the apple slices together with a rubber band.
The science behind the experiment
Not only lemon juice can prevent apple browning, but also reducing oxygen exposure. Placing apple slices into an airtight container, like in sample #2, effectively preserved freshness. The rubber band method also worked reasonably, though not as efficiently as the lemon juice or airtight methods. Need step-by-step directions and science printables for this experiment? Go here >>> Simple Apple Science.

12. Create an Explosive Firework Display
Go out with a bang inspired by “The Little Mermaid” with a homemade firework experiment. Combine milk, soap, and food coloring in a small container to witness a dazzling chemical reaction.
What you need
- Milk
- Dishwashing liquid
- Q-tips
- Shallow plate
What to do
Pour some milk into a shallow bowl. Add a few drops of food coloring. Dip Q-tips into soap, and then place the soapy end in the middle of the plate.
The science behind the experiment
Soap’s key function here is to lower the surface tension. This is clearly visible when dish soap is added to milk, reducing its surface tension and enabling the free movement of fat and protein components.
Leave a Reply