Inside: These crystal snowflakes are not only beautiful to look at, but they also offer a fantastic science lesson as well. This activity explores saturation, evaporation, solutions, how temperature affects chemistry, and how molecules can fit together in a repeated pattern (crystallization) – quite a bundle!
As always, I have my kids to thank for their help in making this activity available to you.
As soon as I mentioned that I don’t have any snowflake activities on the blog, they said, “Crystal snowflakes, Mom! They are the best!” And, of course, they wanted to do it right away!
Making sparkly crystal snowflakes is a classic science experiment for kids, and we’ve been making them for years. In fact, I just recently threw away the ones we made in 2010, which I kept for sentimental reasons and hung in the kitchen as a holiday decoration every year since. But as time passed, they got incredibly dusty, and since crystals are impossible to dust, they had to go. But I’m not complaining since it gave us the occasion to make more!
Here’s what your kids can learn from this activity:
- Experimentation,
- Observation,
- Сreativity,
- How and why crystals form generally, and how to grow crystals from Borax in particular,
- Plus, saturation, evaporation, solutions, and how temperature affects chemistry!
How to Make Crystal Snowflakes from Borax
Crystal snowflakes are a perfect science activity for preschoolers, kindergarteners, elementary students, middle schoolers, and even high schoolers. No one can resist pretty sparkles!
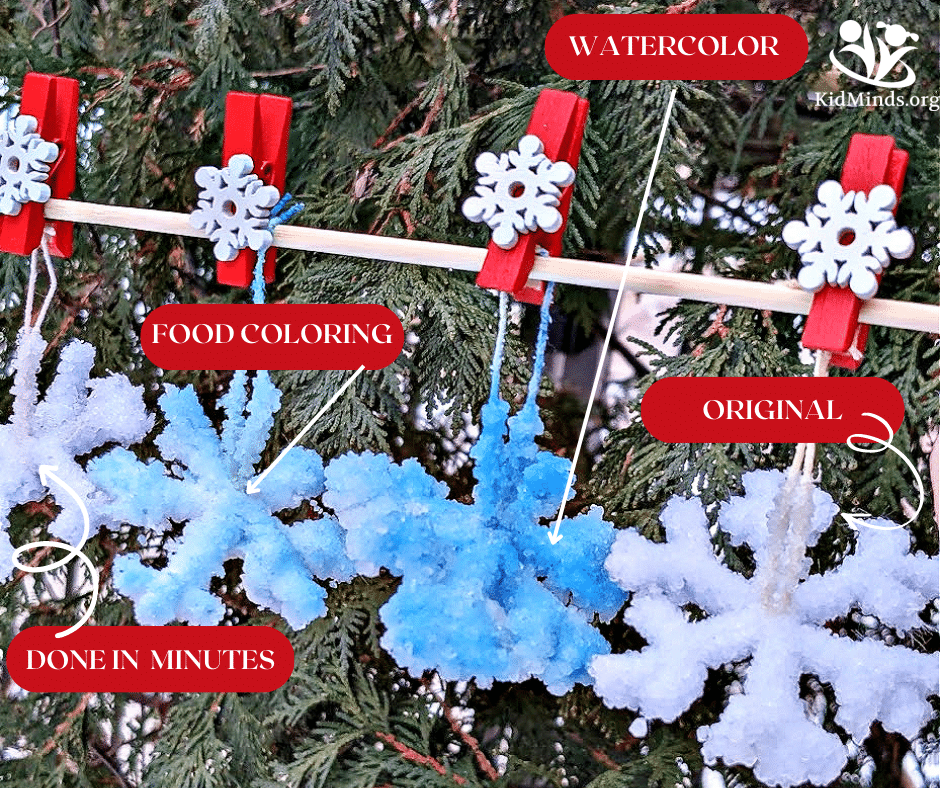
I will also show you how to paint Borax snowflakes with watercolor paints and how to make them super fast (in 15 minutes or less).
What you need
2 Pipe cleaners per snowflake
String
Pencil
Mason Jar (or something similar)
Borax
Blue food coloring (optional)
A clothespin (optional)
Boiling water

What to do
1. Build a Frame
Snowflakes always have six arms. We wanted to make them small enough to fit inside a glass, so we cut pipe cleaners into 3-inch long pieces.
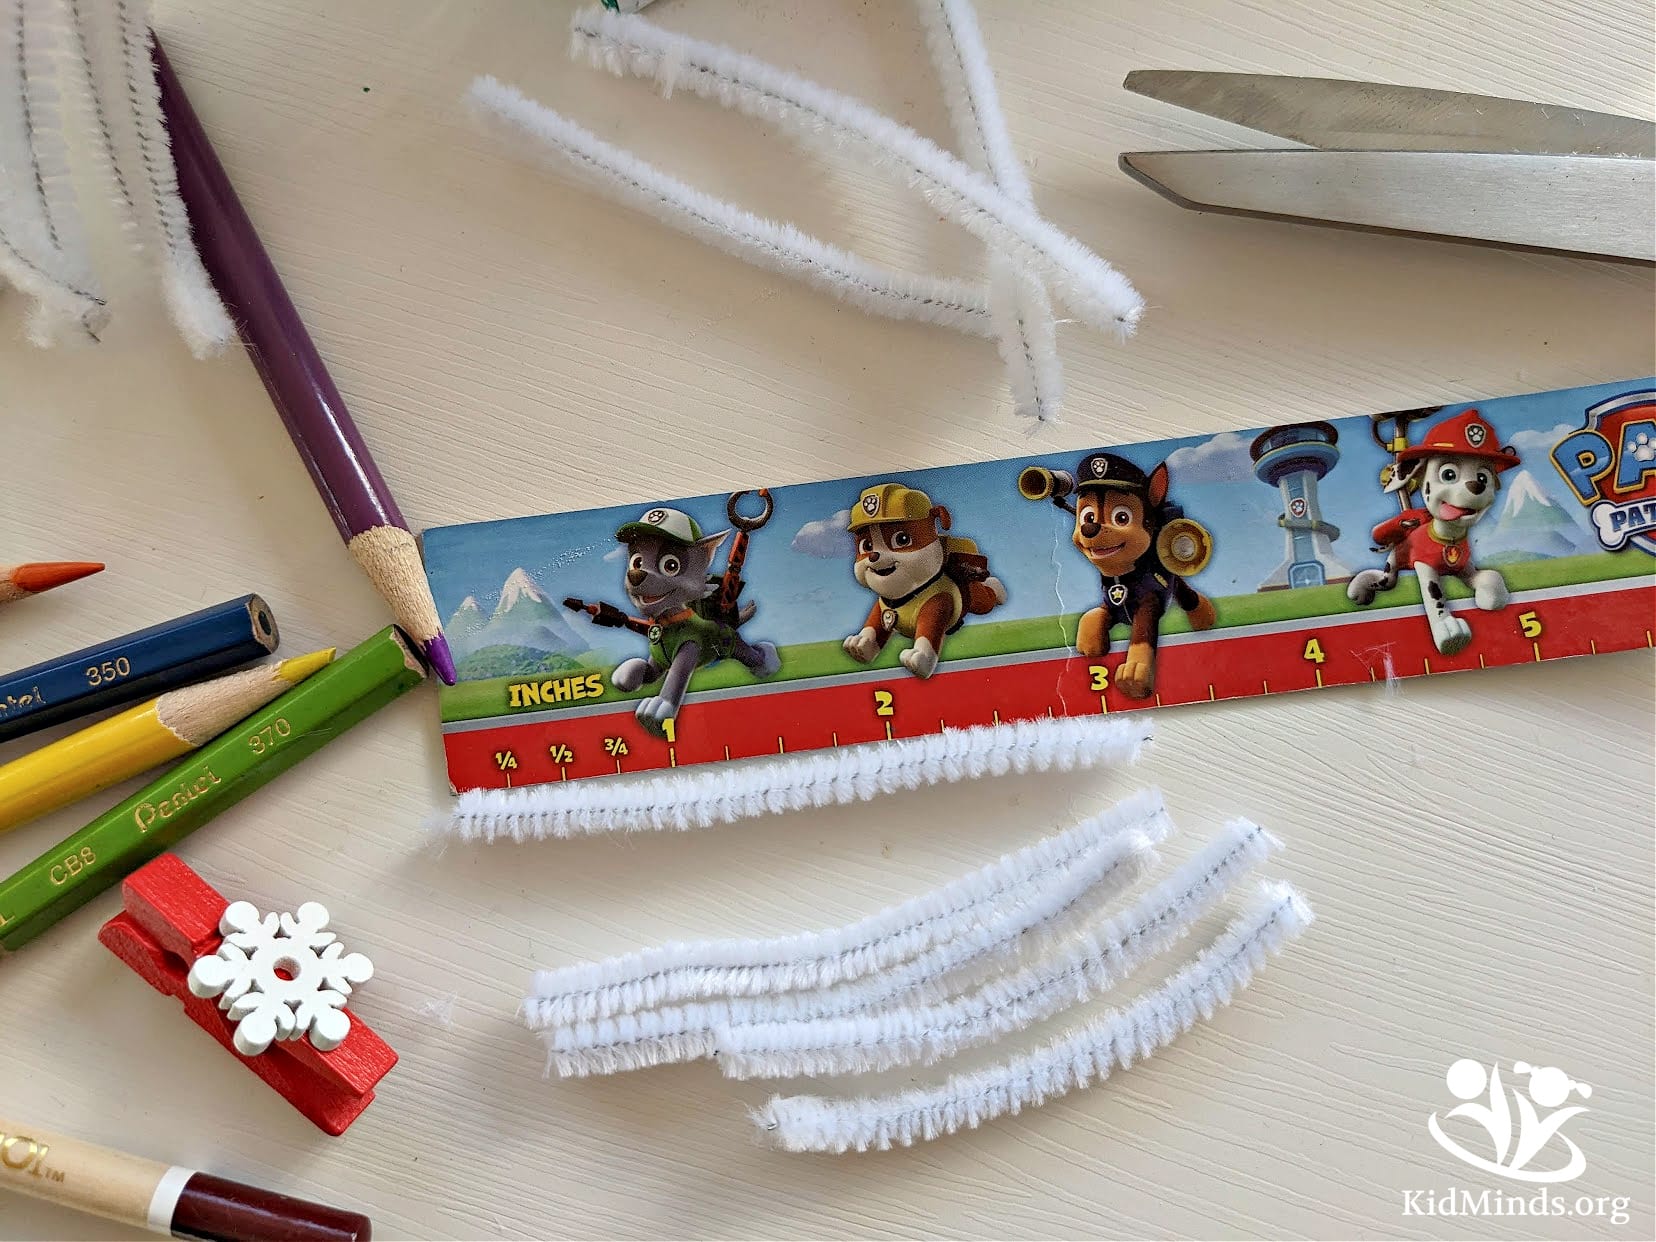
Take 3 and twist them together in the center.

Then, cut the remaining pipe cleaner into half-inch pieces and twist each one near the tip of the arm to add those extra spikes for a more sophisticated snowflake effect.

2. Make a Borax Solution
No matter how many snowflakes you plan to make, stick with a 1:2 ratio—one part borax powder to two parts water.
Since we wanted to experiment with putting some snowflakes in a freezer while keeping others out at room temperature for the night, we needed a lot of Borax solution. We ended up boiling 6 cups of water with 3 cups of borax powder.
As you stir the solution, you will notice that the powder is dissolving in water until, suddenly, it doesn’t … some powder remains on the bottom of the pot without being absorbed. That’s how you know that the solution is supersaturated. It can’t make any more!

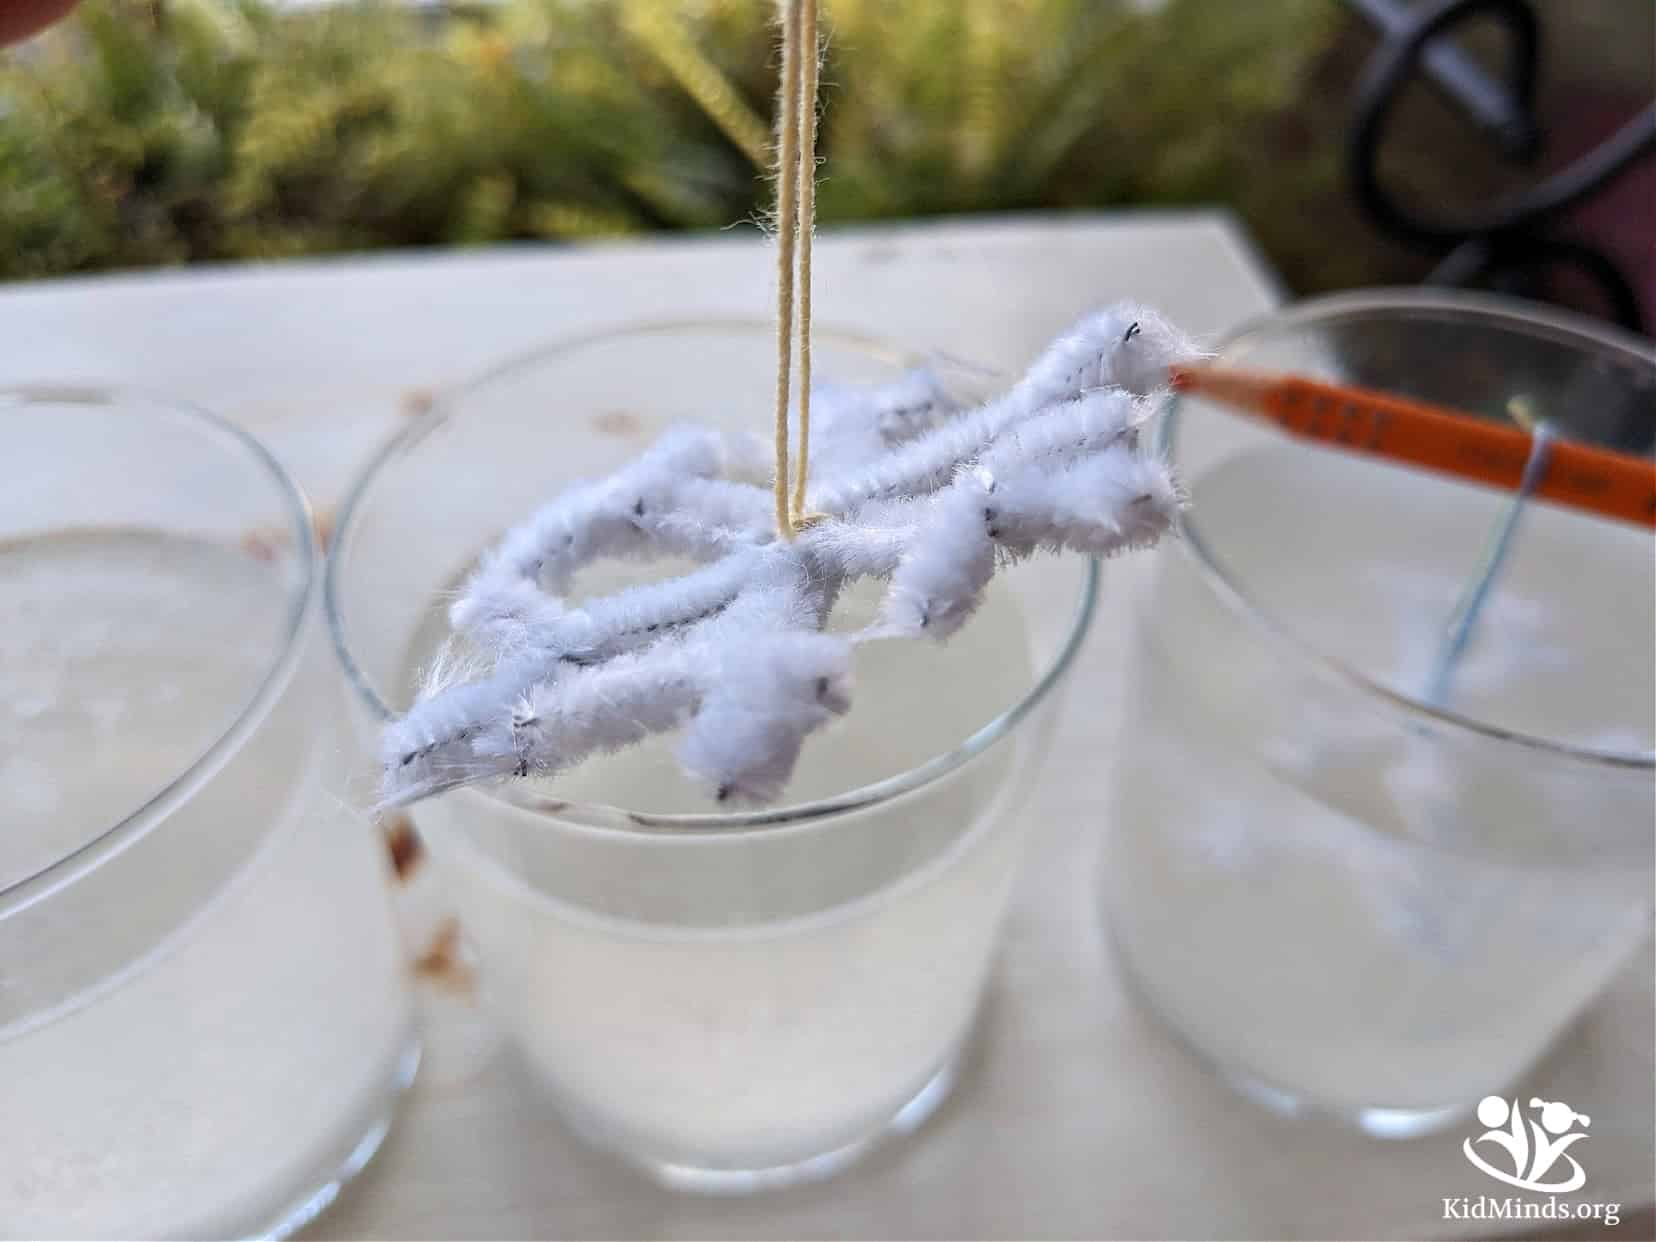
3. Tie a String
Tie one end of the string to the pencil and the other to the snowflake we made in step 1. Now dangle the snowflake inside the jar with the pencil balanced across the top of the jar. The snowflake should hang down without touching the inside walls of the jar.

You can use scissors to trim your snowflake if you end up with one that doesn’t fit inside your jar or bend the edges.
4. Hang
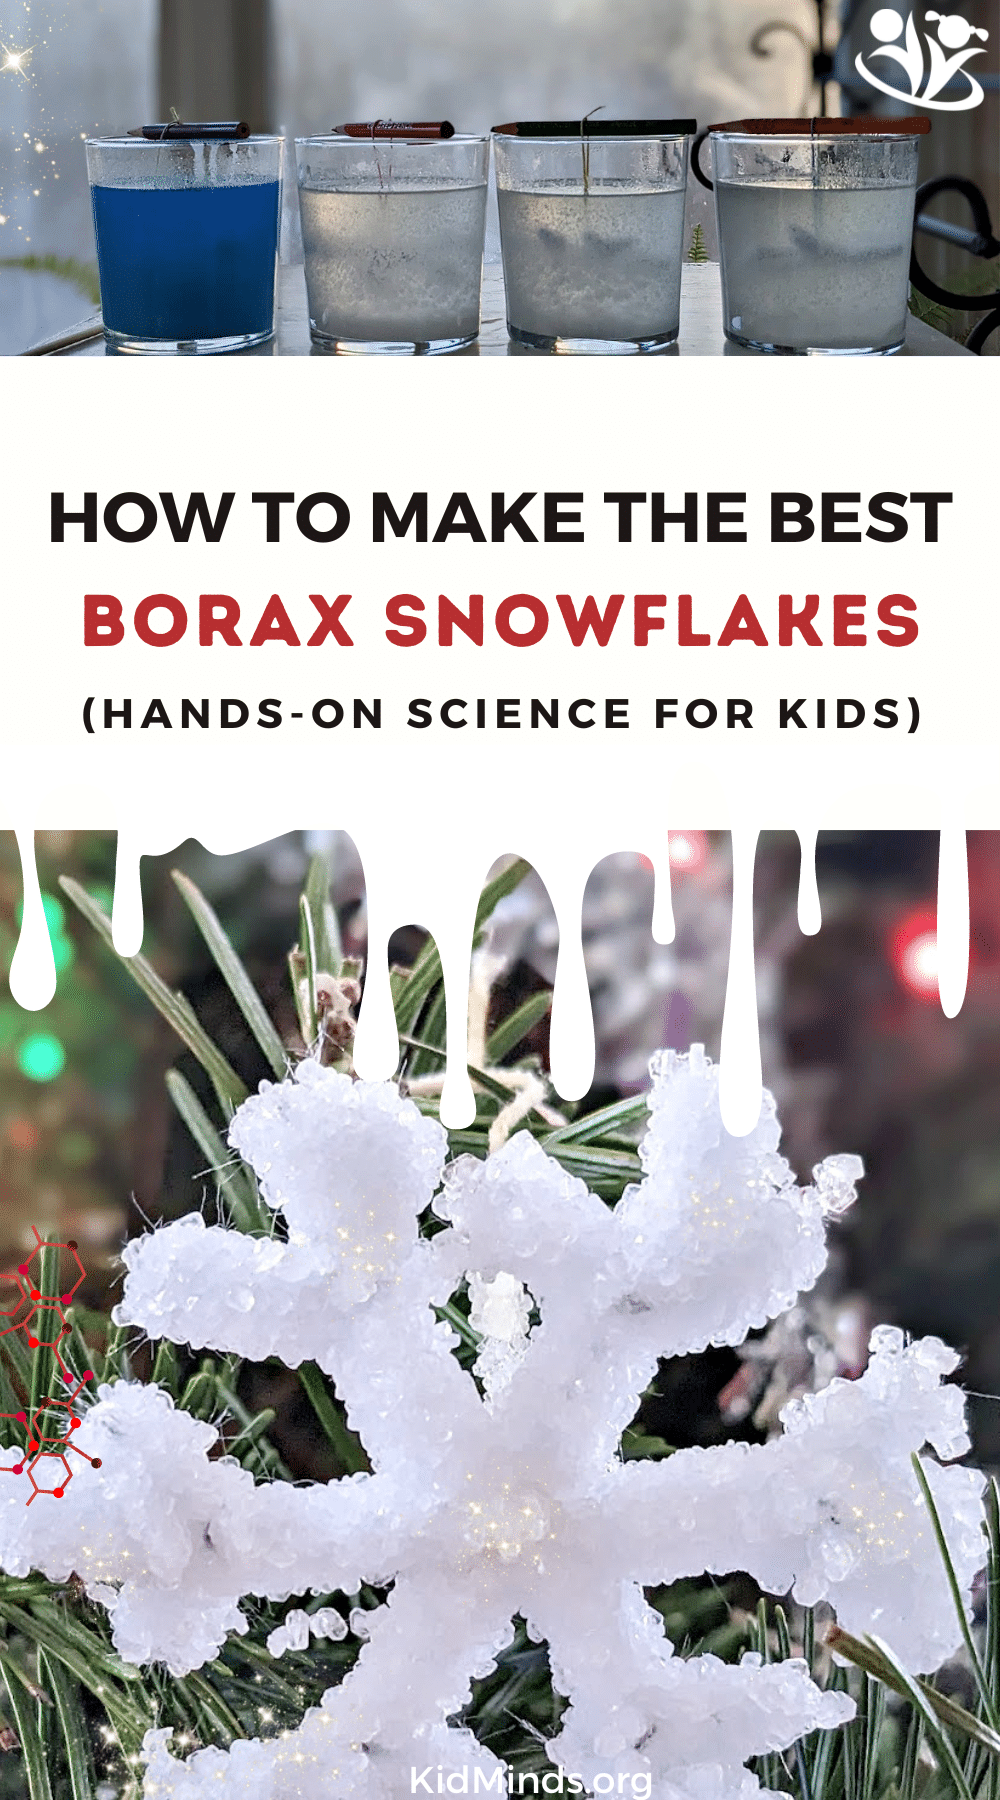
Hang the snowflake in the jar, fill the jars with slightly cooled Borax solution, and let them sit overnight. Try not to move the jar, or you can potentially interfere with the formation of the crystals.

One of my kids added blue food coloring to the jar to make a blue snowflake. You can see it in the pic above on the far left.
We also put a few jars in the freezer and discovered that you could have a completely formed, perfectly cute Borax snowflake ready in just under 15 minutes.
The best way to get your snowflakes dry is to put them on paper towels. If you wish, you can use watercolor paint to color your snowflakes a different color.
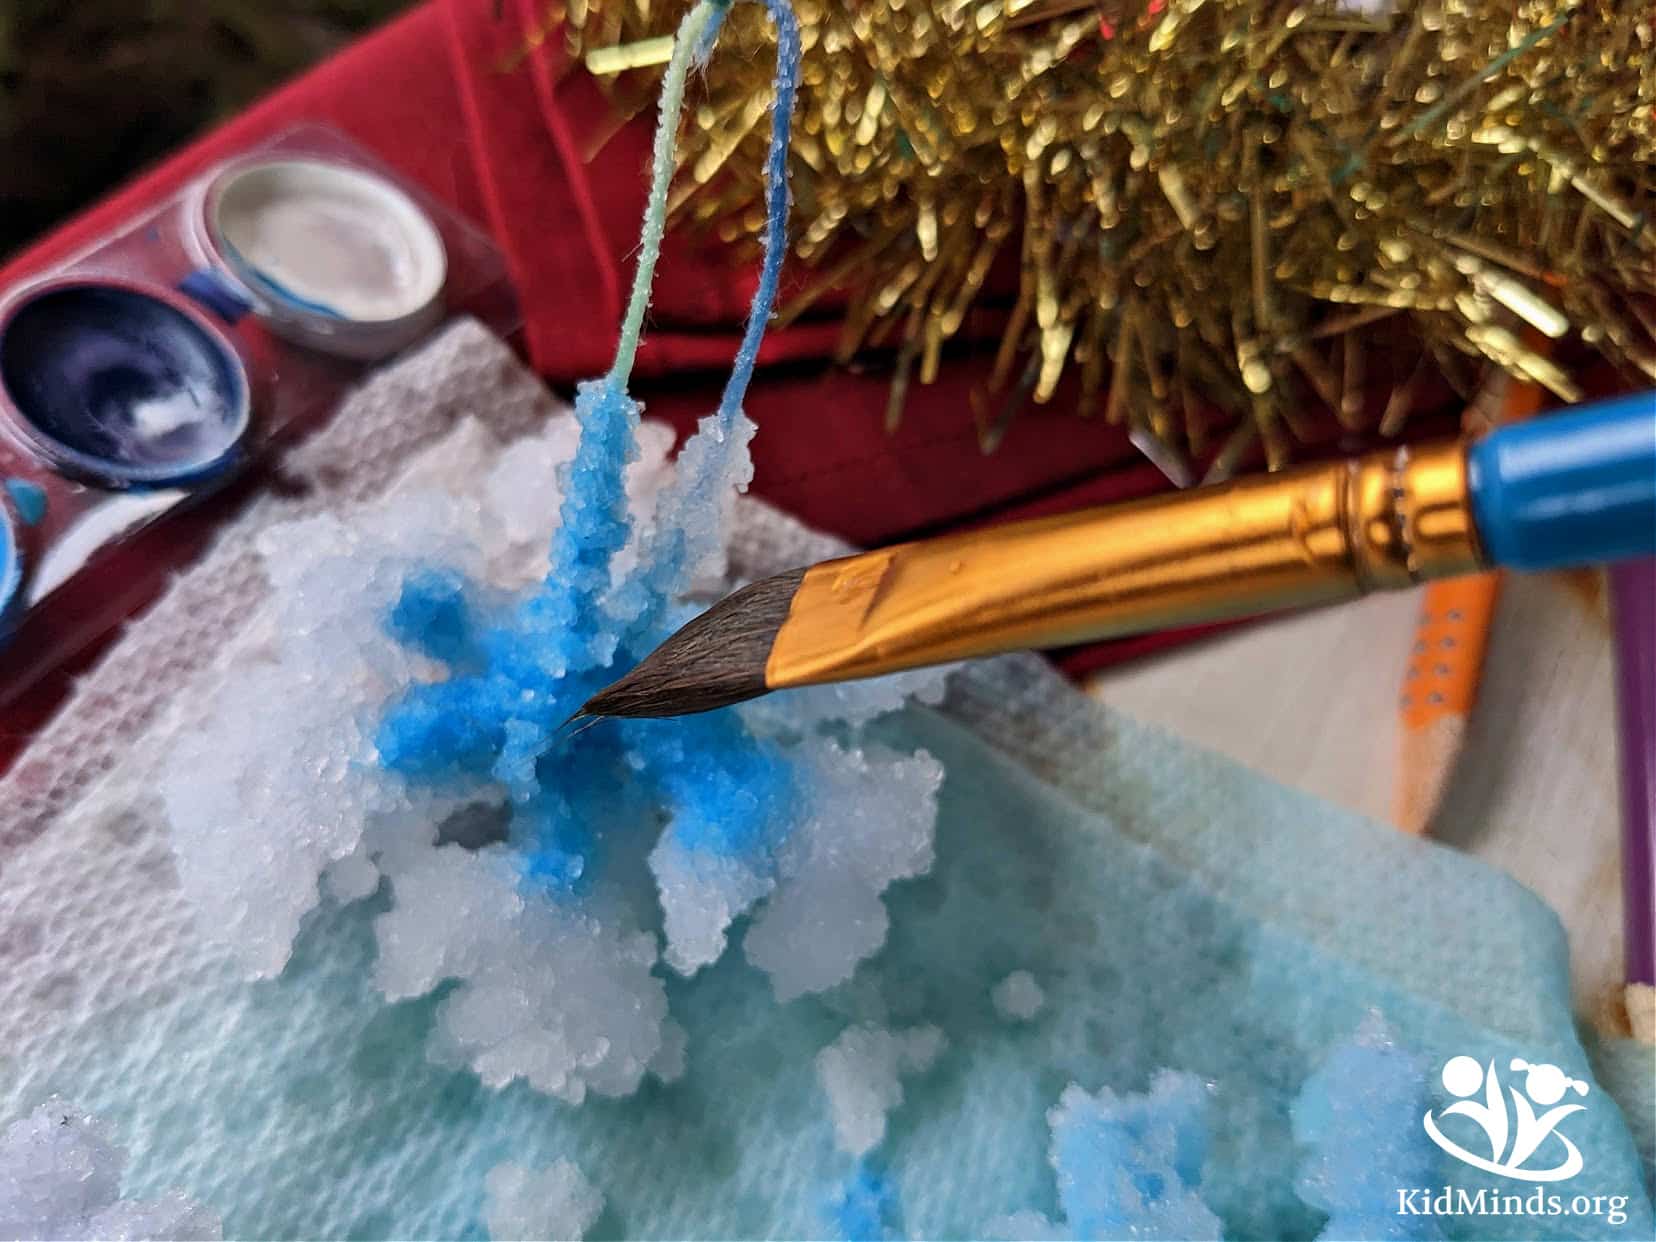
Pick the color you want on the brush and gently rest it on top of the snowflake. Since it didn’t dry yet, the watercolor flows and spreads without effort. You don’t want to rub the Borax snowflake with a brush for an obvious reason; you don’t want to break the crystals.
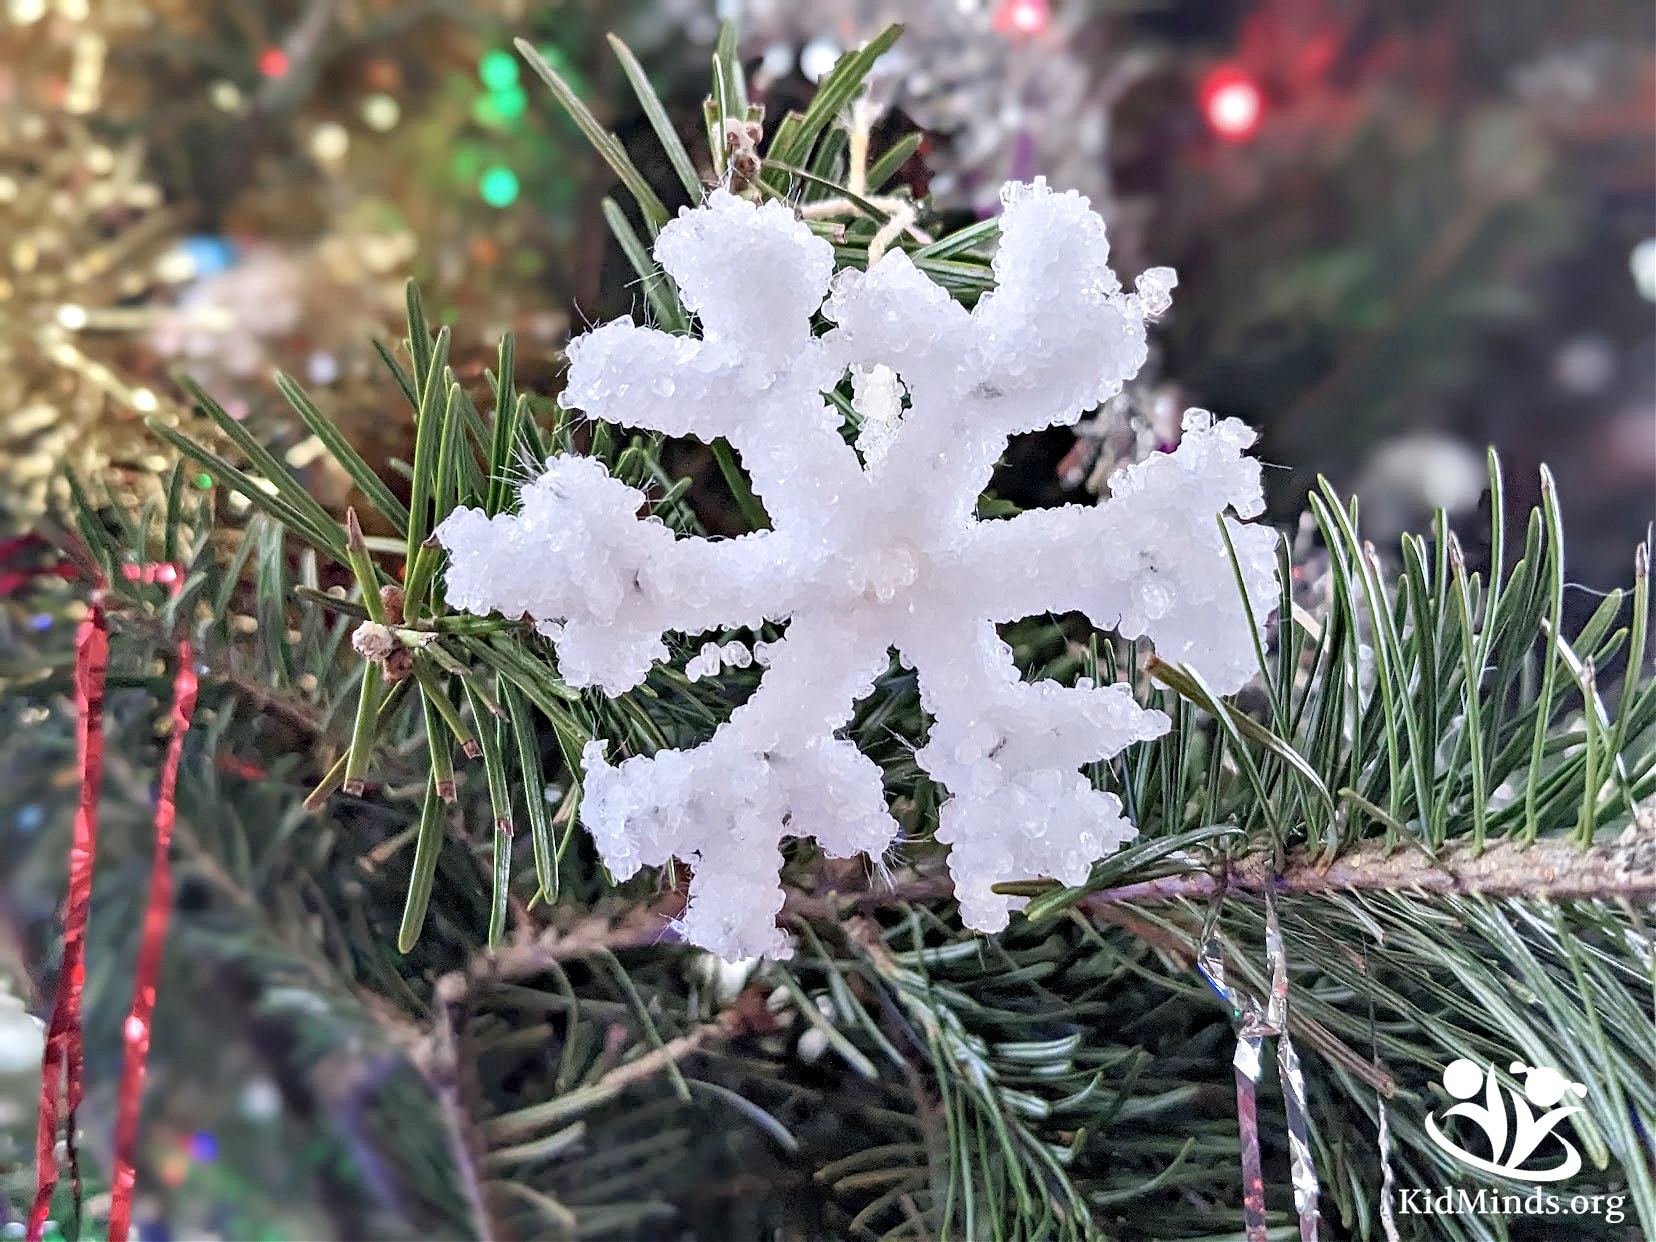
Crystal snowflakes are sparkly and look stunning as decorations on a Christmas tree. But if you have little kids, you should wait till they are older and can resist the urge to pick up a snowflake to play with it. Borax is quite dangerous and should not be touched with bare hands!

One more fun thing to do with your snowflakes is to grab a magnifying glass and study the snowflake in detail. The photo above doesn’t do justice to the intensity of the sparkle and the beauty of individual crystals.
The Science Behind Borax Crystal Snowflakes
Let’s start with some definitions. First, what is Borax? It’s a chemical compound combining boron and sodium, a complex structure which, when solid, forms a crystal.
What’s a crystal, you ask? It’s a solid compound that arranges its molecules in a repeating pattern. Salt and sugar, for example, like to form cubes. Water, when frozen solid, likes to form hexagons (snowflakes!). It all has to do with the unique arrangement of the atoms in that molecule.
Borax in a box is in crystal form, but it’s all broken into tiny pieces and jumbled up. We need to reform the crystal – dissolving the borax in a solution and then letting it form new big and beautiful crystals. That’s where the water comes in, but there’s a catch.
When the water is cold, the borax actually doesn’t want to dissolve into it. Cold water has less space between its molecules, and since borax molecules are quite large, it doesn’t have much space to fit in.
So we heat the water, get its molecules moving faster and increase the space between them – now there’s enough space for the borax molecules, and it dissolves! Finally, for the really cool part.

What we have here is a super-saturated solution, a solution that can absorb a solute if you force it to a high temperature but not otherwise. So, as the water cools and the space between its molecules contracts again, the borax gets pushed back out – it separates from the water and solidifies again, this time covering your pipe cleaners with gorgeous new crystals!
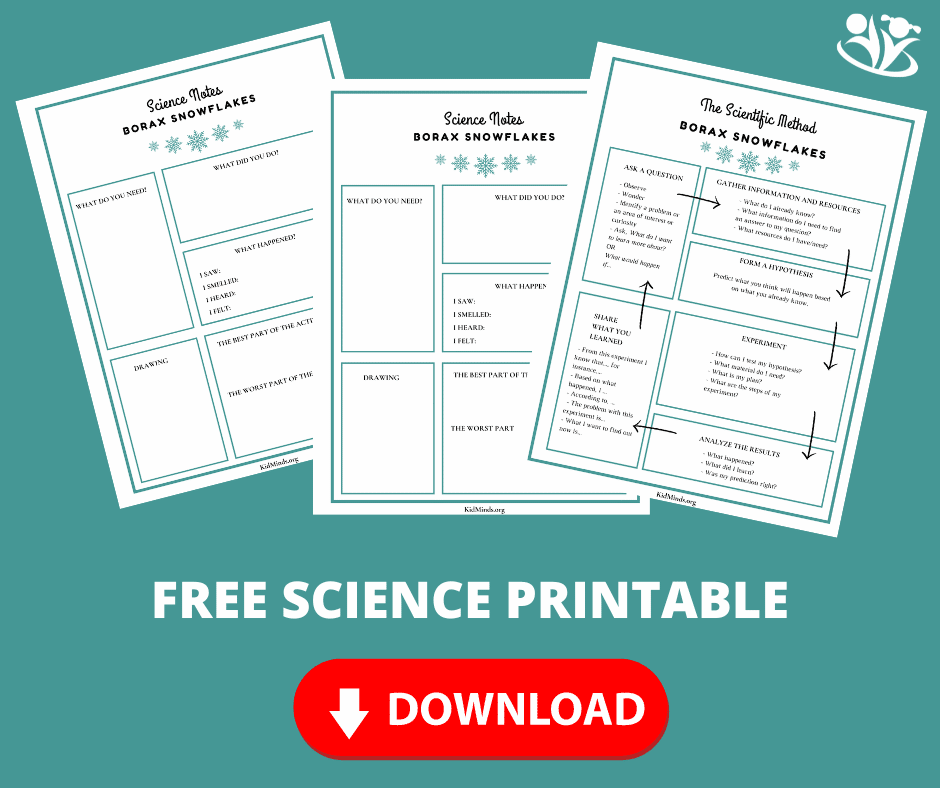
Want to dive deeper with your kids? You can download the FREE STEM pack below for step-by-step instructions for forming a hypothesis, designing an experiment, and learning the scientific method inside out.

Related

[…] jotting down ideas for winter-themed science ideas for the next season. Icy hot Christmas science, Crystal snowflakes, Frozen marbles, cranberry science, snow, and so much more. This might be a bit involved for […]